


Having an Issue? Try these Tips
Every fan and control is tested before it leaves the factory, resulting in an extremely low rate of returns. However, due to shipping and installation procedures, occasionally a fan will need a minor adjustment to run satisfactorily. If this should happen, we recommend that you identify the problem and try the simple suggestions listed below, before attempting return procedures. One of the following suggestions will usually solve any of these problems that sometimes occur.
Ceiling Fans:
1. Fan will not start:
**Caution: Turn off power at main circuit breaker before checking**
- Check fuses and circuit breakers.
- Check wire connections to fan.
- Check wiring connection in lower canopy.
- Check voltage at fan connection.
2. Fan too fast or too slow:
- Adjust the trim set screw in fan control.
- Check voltage at fan connection.
- Refer to motor construction instruction.
3. Fan makes noise:
- Check motor case to make sure all visible screws are snug.
- Check to make sure that all blade bracket screws are tight.
- Check for labels or wire nuts that could be rubbing.
- All ceiling fans may have a slight motor noise known as the “60 cycle hum” when used with solid state, infinite or speed controls. Especially on lower speeds. This hum will not affect the fan performance.
- Allow a 30-day break-in period which normally eliminates any residual noise other than a, b, c, or d above.
4. Fan wobbles:
- Check that all blade brackets are screwed firmly to motor case.
- Check distance from tip of blades to ceiling. If blades get bent during installation, you must readjust them so that all blades travel on same plane. Gently bend up or down until all blades are the same.
- Make sure upper canopy is 1/8″ from ceiling.
- Make sure that hanging hooks are secured tightly to ceiling.
- Run fan without blades, if motor does not wobble, then motor is not defective, but the blades maybe bent.
- Make sure to remove excessive dust/dirt on blades.
- Check blades for damage. Even the smallest imperfection can cause wobbling.
5. Fan control:
- If a speed control is installed, check the voltage at the control to ensure it is wired correctly and was not damaged or defective during installation or connection to the power source.
Speed Controls:
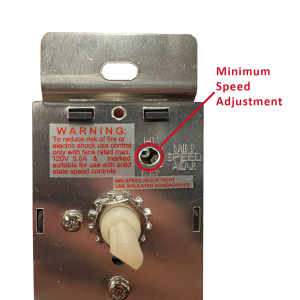
1. Minimum speed adjustment:
This control was designed to operate on motors used in diverse applications. A minimum speed adjustment is provided to allow independent control of the minimum speed setting. Minimum speed adjustment ensures motor runs with sufficient torque to prevent stalling.
- Motor must be in actual operating condition to achieve proper speed adjustment. Motor will not slow down unless proper load is applied.
- Turn main control knob to lowest speed position.
- Locate and adjust minimum speed setting on front plate with small screwdriver (rotate clockwise to decrease minimum speed; counterclockwise to increase minimum speed). Special Note: For 2.5 and 3.0 Amp models, adjustment of minimum speed is reversed. Rotate clockwise to increase minimum speed; counterclockwise to decrease minimum speed. On some models minimum speed adjustment hole is located on side of control.
- Motor will now operate from this preset minimum speed to full speed.
If you continue to have trouble after trying these solutions, please contact your distributor or our service technician at 1-888-822-6845 or email returns@banvil2000.com.
Return Policy
Conditions for Return:
- Notification Period: Banvil must be notified by the customer of a return request within 90 days from the original order shipping date.
- Shipping Deadline: Once the return is approved, the customer must ship the product back within 10 business days of receiving the Return Material Authorization (RMA).
- Product Condition: The item must be unused, in resalable condition, and returned in its original, undamaged packaging, including all boxes, accessories, manuals, and any other materials originally provided.
- Final Sale Items: Products that have been installed or modified are considered final sale and are non-refundable.
- Restocking Fee: Products that have not been installed will have a 20% restocking fee deducted from the refunded amount.
- Shipping Charges: Original shipping charges are non-refundable.
Process for Return:
- Submit Request: The customer must submit a return request by filling out the online Banvil RMA Form before sending any product back.
- Receive RMA: Once eligibility is confirmed, Banvil will provide an RMA and the return shipping address.
- Shipping Responsibility: Please carefully package the items to prevent damage during transit. Include the RMA.
- Shipping Costs and Risk: The customer is responsible for the return shipping costs. We strongly recommend using a trackable and insured shipping method, as Banvil is not responsible for items lost or damaged during return transit.
- Inspection and Notification: Once the product is received, Banvil will inspect the item to ensure there is no damage, and all original parts are included. We will notify you of the approval or rejection of your refund.
- Refund Processing: If approved, the original purchase amount, minus the 20% restocking fee, will be processed. The credit will automatically be applied to your original method of payment within 10 business days.
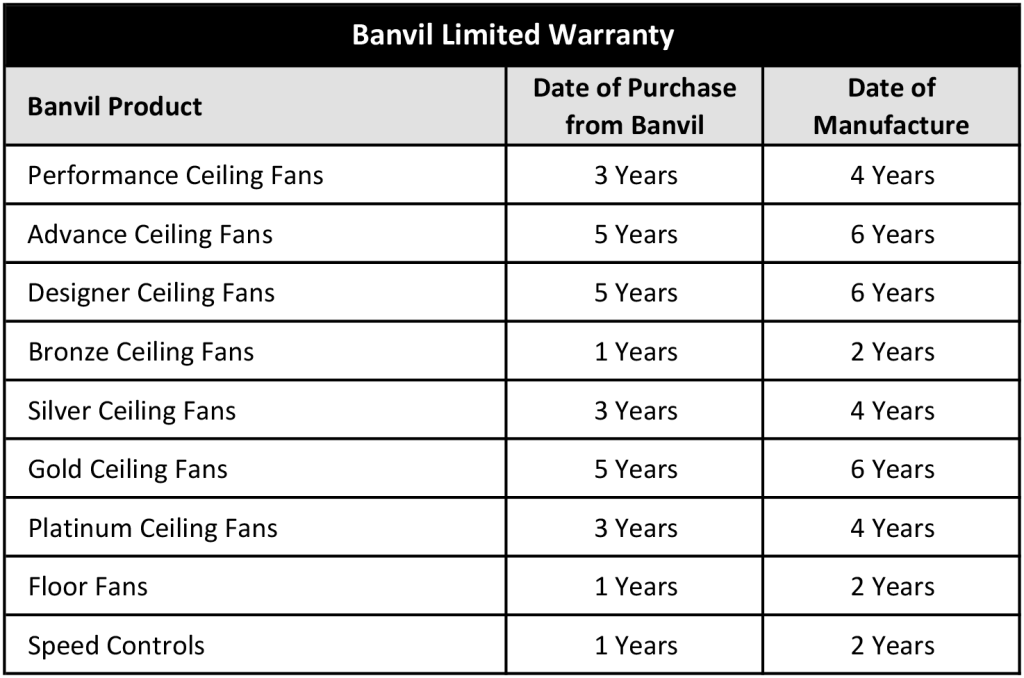
Banvil Limited Warranty
Warranty Coverage:
Banvil warrants to the original purchaser for the period stated in the chart below. Banvil will, at its discretion, repair or replace the fan if it malfunctions or fails due to defects in workmanship or materials. This warranty does not cover labor costs associated with the removal, reinstallation, freight and any other transport charges.
Exclusions:
This warranty excludes defects, malfunctions, or failures caused by improper installation, mishandling, unauthorized modifications, inadequate repairs, or unreasonable use.
Limitations of Liability:
Banvil’s liability in all events is limited to the purchase price of the product. Under no circumstances shall Banvil be liable for any consequential or incidental damages arising from defects in workmanship or materials.
How to Obtain Warranty Service:
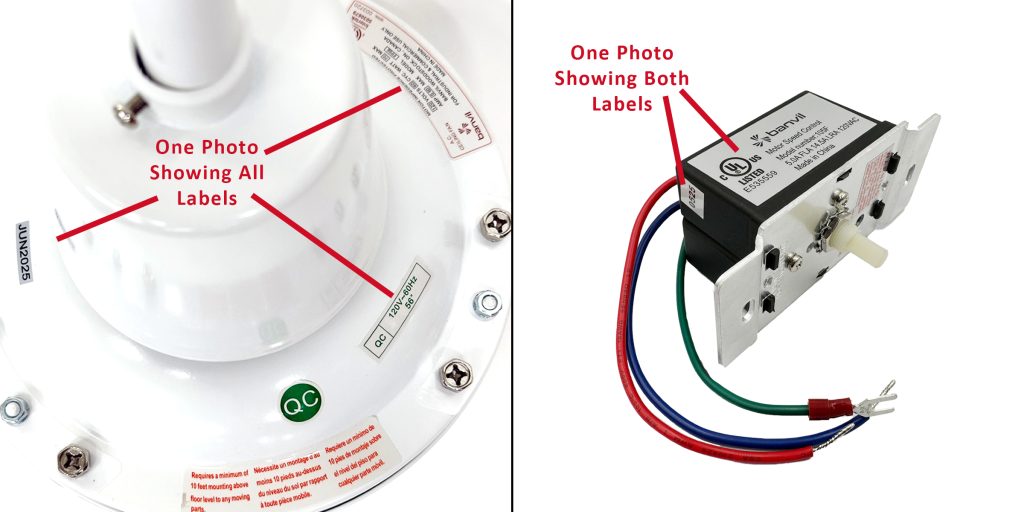
To obtain warranty service, please complete the form below. Be sure to include a photo showing both the manufacturing date and product label (see sample image), along with the reason for your return. The form cannot be submitted unless all required fields are filled out.
If you are asked to return a product to Banvil, please ship it to:
Banvil
470 Industrial Ave
Woodstock, ON N4S 7L1
1-888-822-6845
returns@banvil2000.com
All returns must be shipped to Banvil with freight prepaid by the customer. All returns must be properly packaged to prevent damage during transit. Any product returned without proper packaging will void the warranty. The end user is responsible for the removal, reinstallation, insurance, freight, and any other transport charges.